Let’s face it: categorizing transactions is a drag. QuickBooks Online offers you a better, faster way to do it.
If you’re importing transactions into QuickBooks Online from your bank (and we hope you are), you probably roll your eyes when you see a big number in parentheses after For review on your Bank transactions page. On one hand, it’s good to know your business is very active. On the other hand, it means you have to spend some time going over your transactions and categorizing them.
As tedious a task as it is, it’s critical that you keep up with transaction categorization – and do it accurately. If you don’t, your income taxes and reports will not be correct. You could miss out on taking deductions for legitimate business expenses and have inaccurate views of your overall financial picture.
QuickBooks Online provides a simple, effective way to speed up this onerous process. You can create Rules by identifying transactions whose Description, Bank text, or Amount are the same. QuickBooks Online can then automatically categorize related transactions and move them into the Categorized list. Let’s look at an example of how this can work.
Identify, Then Create a Rule
Open the list of bank transactions that have come into QuickBooks Online since the last time you logged in (Transactions | Bank transactions | For review). Scroll down until you find one from a vendor you know has repeat entries. Let’s say you want every transaction where “The UPS Store” is the vendor to be categorized as Office Supplies. Find one of these transactions and click it to open the expanded view.
Complete any fields needed and click Create a rule at the bottom of the box. A pane like the one pictured below slides out from the right.
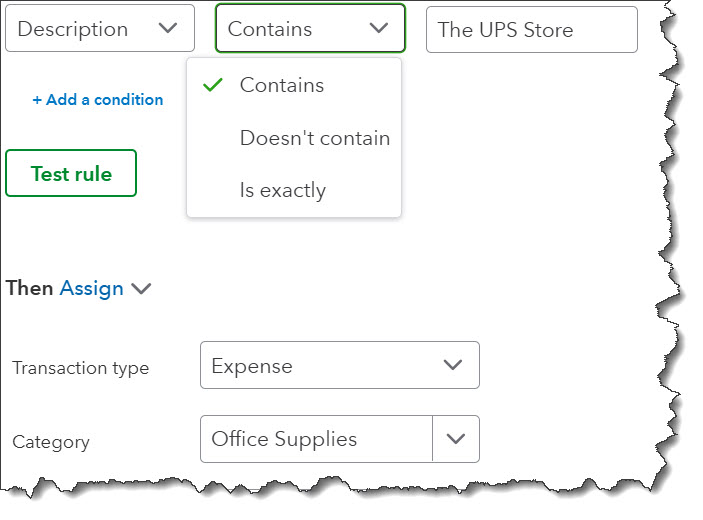
QuickBooks Online allows you to set up Rules to automate transaction management.
You’ll first have to give your rule a name. For our example, we entered UPS Shipping. We wanted the new rule to apply to transactions that involved Money out, and we wanted QuickBooks Online to look in All bank accounts, so we selected those options from the drop-down menus supplied.
You can see in the image above that we had to specify three conditions that needed to be met in order to trigger an action (we also selected All as opposed to Any, meaning the transaction had to meet all three conditions). In the first field, we chose Description (usually the vendor), rather than Bank text (a text field generated by the bank that sometimes looks like gibberish) or Amount. In the second and third fields, we indicated that the Description should Contain “The UPS Store.” If we’d wanted to, we could have added another condition.
Next, QuickBooks Online wanted to know how we wanted the matching transactions treated. We wanted to Assign (not Exclude) them as Expenses, with the Category of Office Supplies. We didn’t need to select a Product/Service, but we selected the correct vendor for the Who you paid field.
Note: As we already said, when QuickBooks Online sees a transaction come in from your bank that has to follow a Rule you created, it will move it into the Categorized column by default. You won’t see it in For review. This is why you need to be so careful. You can change that default behavior, though, by clicking the button next to Auto-confirm at the bottom of the pane. QuickBooks Online will still automatically categorize transactions governed by that rule, but they will remain in For review until you confirm them there.
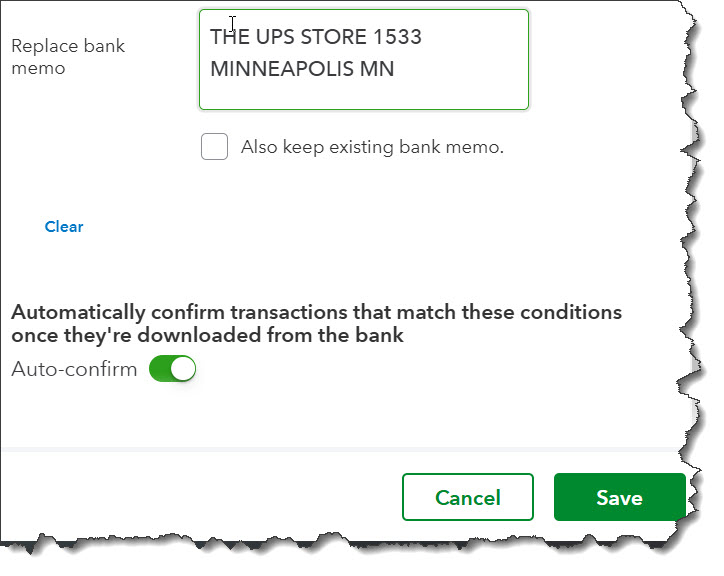
If the Auto-confirm button is toggled on, transactions that meet the conditions of the Rule we created will be categorized and moved directly into the Categorized column on the Bank transactions page.
When we were satisfied with our Rule, we clicked Save. We were able to see our new Rule when we clicked Transactions | Rules. You can also create a New rule from this page rather than looking for a transaction.
What Else Can You Do with Rules?
We only provided one example here, but it’s a commonly-used one. Let’s look at some of the other options you have when you’re creating Rules.
- You can set them up to apply to transactions that involve Money in, even specifying the account. In addition to categorizing them, you could set up conditions for the transaction to be treated as a Deposit or Transfer.
- Would you like to be alerted when specific transactions exceed a certain dollar amount? You could build a Rule that would automatically confirm purchases to a specific vendor if the amount was less than $250. Transactions for larger amounts would then remain in For review, so you’d have to manually confirm big ticket purchases.
- QuickBooks Online’s Rule can also assign transactions that meet your criteria to specific Tags and Customers.
Precision is Critical
We wanted to describe this tool to you primarily so you can minimize repetitive categorization. It’s easy to set up Rules like that. If you want to go deeper into QuickBooks Online’s options here, setting up multiple conditions and prioritizing Rules, we recommend you schedule a session with us. We can help ensure that this is a positive, time-saving experience for you. Contact our office anytime.